Monday, May 6, 2013

Addendum to Pinning

Here are some of the pictures of the pinning I did this weekend.
Here is my Stormsmith in progress. I just need to clip down the pin a little more to get everything together on him.  Should stay together after this.


 Here is my Blackclad Wayfarer.  His left arm was jointed at the elbow and had to support the whole weight of the axe. Now that its pinned he should be able to hold onto to it.
 Here is my Tharn Ravager Shaman.  His joint at the shoulder was a huge pain because not only were they flat surfaces to hold together but there was no ball and socket to line them up properly.  This pin should keep his arm from falling off in a strong breeze.
And finally General Adept Nemo. His extended arm had a nice joint at the elbow and a socket in the gauntlet to fit the arm into, unfortunately the whole weight of the arm and weapon were too much to handle and it would keep getting knocked off.  When I drilled out the forearm I kept losing my line I was drilling on and ended up drilling out of his wrist a couple of times.  Finally got that lined up and I should be able to cover the holes in his wrist with paint.

Pinning Isn't That Tough

Being a miniature gamer with cats is an always interesting scenario.  After building my gaming table I would set all of my armies out across the table to get a good of how much I still have to paint and how much I still had to prime.  It was a great visual of how bad at getting to painting I've been....since time began.
As you can see I really had a lot of work ahead of me.  I've finished all the priming that needs to be done finally and started work on painting.  You can see some of the work back a few posts.  The only downside to this scenario is that when I would leave my miniatures on the table in such a fashion my cats would walk across the table top.  Now you would think cats being the graceful creatures they are would be able to step between and around this little miniatures.  Unfortunately those are not my cats.  I would constantly hear them being knocked over or around as the cats took refuge on the table top away from the dogs.  This in turn led me to constantly be gluing certain models back together.  It was the same group for the most part.  Certain models had joints that just didn't have a lot of surface to make the glue hold tightly.  This led me to finally grab my pin vice and attempt to pin some models together.

Now I have had my pin vice for almost a decade and have never attempted to pin a model.  I've had lots that I've set aside and not finished assembling because I've looked at the arm joints and just not wanted to deal with the pain of trying to get them to glue together.  So after having enough this weekend I grabbed one of the repeat offenders and went to town on his shoulder.  I always thought I would need to use my Dremel to actually drill enough into a model to get a good hold with a pin.  Not so, after a minute or two of hand drilling I had a workable hole that I could fit my paperclip pin into and glue down.  Wow, that was an easy step.  Now to try and line up the arm and make this work.  
I forgot to take some pictures of the joints while actually working on those so I apologize this won't be a more visual post.  Here is the boat-load of models that need a little pinning to stay together.  Getting the pin joint to line up was a bit trickier but most of the models also lent themselves well to giving me a good idea/making a good guess.  All in all I had about 5 models that I got pinned this weekend.  One of the ones I was extremely proud of was a Stormblade whose glaive was broken off right above his hands so that it was a smooth break between the glaive blade and the haft.  Pinning that joint made the model look like it was never broken.  I'm going to try and get some pictures of the individual models that I've pinned and point out the joints.

 Here is the main offender, Ninja.


And her accomplice Echo.

Tuesday, April 30, 2013

Finally got a picture of my costume from Ring Game.  It was taken by the awesome Jack Barker.  You can see more the pictures from this game over at Ring Game.  The gauntlets lasted a lot better then I thought they would during the game, and the costume kept most of the brambles and bugs away from me.  Now to get into shape for the fall war.

Wednesday, April 24, 2013

Ring Game Costume

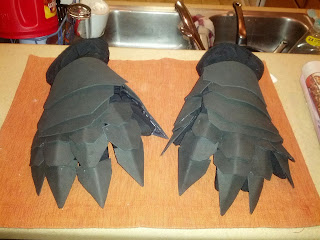
I took a picture of my gauntlets I finished last night. I'll try and get some pictures up of the full costume this weekend.

Monday, April 22, 2013

Current Projects

So after my last update I went and ordered a 5lb bag of Merlins Magic.  I then started casting according to the instructions and filled all four of my molds and filled an entire tray in the dehydrator.  With my next batch I tried to adjust the ratio of plaster to water to try and fill more molds.  I thought I was erring on the side of too much water, but then I found that I was adding too much plaster that wasn't getting mixed in completely and leaving quite a bit in the mixing cup that was far too thick to pour into the molds.  Adjusting some more I think I found the right ratio and that was that.  I decided to up my game a little and make a vibrating table to really make my blocks solid.  After looking at a few stores I found a neck and back massager at the local Walgreens and mounted it to my table and set to work on another batch. I thought I had done something wrong when I went to scrape the molds and I had almost nothing but a layer of water across the top.  Letting my brain catch up to me I realized that this meant all the plaster had settled into the molds instead of riding along top.  So letting the molds dry so I could remove the pieces also showed me that they now dry incredibly fast compared to before the vibrating table.  So all in all I'm even more happy going with the Merlins Magic and building the vibrating table. Now I just need to settle on a project to move towards.

In other projects, Ring Game is this weekend.  Ring Game is a Lord of the Rings Live Action Strategy Game.  While we do dress up, its not as role play-y as LARPing. This spring I'm playing a Nazghul. I made my costume this weekend, I went with the dark rider type costume from the movies.  Now if only I was in better shape to be sprinting around the park.  I'll be working on the gauntlets this week.  I will try to post pictures of those when I complete them.

I also received my Reaper Bones Kickstarter miniatures package.  I traded in the Sophie model for the carrying case.  I can fit around 3/4 of the miniatures in the carrying case.  I think I'm going to use the extra slots for paints and carry that around with me to get some more painting done.  Since most of miniatures will be immediately useful in our DnD 4E game I am going to focus on those to begin with.

Ninja wanted to help unpack.


Friday, April 5, 2013

Adventures in Plaster

So the other day I had the tremendous urge to create something. Painting just didn't seem to feed the urge and I didn't have anything papercrafty printed and ready. So I turned to the other other hobby I have. I cast some plaster blocks.  Now my experience with Hirst Arts molds has been on going since I picked up my first one at GenCon in 2006. I've posted pictures of the octagon tower I built with that one here on the blog. Well the bug had bit me and I ordered a few more molds and cast some blocks and then promptly got distracted by something shiny. I had built myself a work table and had some modeling plaster I had picked up at the gaming store but I couldn't figure out another project to work towards. Sure the website had all sorts of projects, but I would just end up looking through the catalog and not getting any ideas to stick.  Now this latest bug has bit and getting the supplies out has shown me why I had stopped last time.  The plaster I've been using, lightweight hydrocal, has a different mixing ratio than the previous plaster I had been using. So my last couple of casts had come out mostly half-assed. I thought it was something I was doing wrong and it turned out to be true. I had been mixing it wrong. Well I still had my sample package of Merlin's Magic. The one that they use and talk up quite a bit on the Hirst Arts website. So tonight I cast using the Merlins, and wow was it a different experience. The blocks filled so neatly and scraped so easily. Now I'm looking up where to order some more to get back into a regular casting habit. So now we can add plaster terrain building to my current obsessions. I'll post pictures as soon as I finish drying the blocks I cast.

Wednesday, March 20, 2013

Missed One

So in posting my paper craft cubee figures the other day, I forgot I had one more to show.  He isn't a cubee but he is paper craft and pretty awesome. I give you Claptrap, or his proper name CL4P-TP.